Plumbing repairs can be quite challenging, especially when you don’t have the right tools. One common issue that homeowners face is fixing a leaking or damaged PEX pipe without having access to a tool. Fortunately, there’s a solution – using a PEX clamp without tool.
In this article, we’ll guide you through everything you need to know about using a PEX clamp without tool for easy and convenient plumbing repairs. From understanding what a PEX clamp is to step-by-step instructions on how to use it, we’ve got you covered!
What is a PEX Clamp?
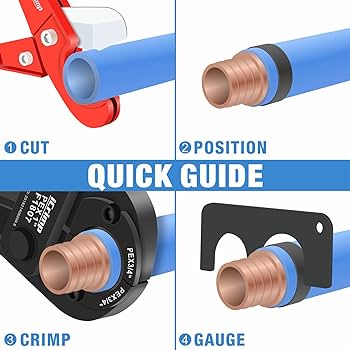
A PEX clamp is an essential plumbing tool that’s used to secure PEX tubing fittings onto pipes. This method of securing fittings is known as the crimping method, which involves compressing the fitting with a clamp until it creates a tight seal around the pipe.
Traditionally, crimping requires the use of specialized tools such as crimpers or cinch clamps. However, if you don’t have these tools at hand, you can still secure your fittings using a PEX clamp without tool.
How Does it Work?
Using a PEX clamp without tool is relatively simple. The clamp itself consists of two main parts – the ring and the collar. The ring is placed over the fitting and positioned around the pipe. The collar is then positioned over the ring and tightened by hand until it clicks into place.
The clicking sound indicates that the collar has been securely fastened onto the ring, creating a tight seal around the fitting and pipe.
Step-by-Step Guide on Using a PEX Clamp Without Tool
Now that you understand how a PEX clamp works let’s dive into how to use it properly:
Step 1: Measure Your Pipe
Before you get started with securing your fittings with a PEX clamp without tool, you need to measure the diameter of your pipe. This is important as it will determine what size PEX clamp you need.
Step 2: Choose Your Clamp
Once you’ve measured the diameter of your pipe, choose a PEX clamp that matches the size of your pipe. You can purchase PEX clamps without tool at most hardware stores or online.
Step 3: Position the Ring
Next, position the ring over the fitting, ensuring it’s snugly fitted around the pipe. The ring should be positioned approximately 1/8 inch from the end of the tubing.
Step 4: Position the Collar
Once you’ve positioned the ring, place the collar over it and twist it clockwise until you hear a clicking sound. This indicates that the collar has securely fastened onto the ring.
Step 5: Test for Leaks
To ensure that your fittings are properly secured, test for leaks by turning on your water supply and checking for any leaks around the fitting. If there are no leaks, then your plumbing repair is complete!
Conclusion
Using a PEX clamp without tool is an excellent solution for homeowners who don’t have access to specialized plumbing tools such as crimpers or cinch clamps. It’s a simple yet effective way to secure fittings onto pipes for easy and convenient plumbing repairs.
By following our step-by-step guide on how to use a PEX clamp without tool, you can save time and money while ensuring that your plumbing system is in good working condition.
Remember always to measure your pipe correctly and choose a clamp that matches its size. Additionally, testing for leaks after securing your fittings is essential to ensure that your plumbing repair is successful.
References:
https://www.familyhandyman.com/project/how-to-use-crimp-rings-when-installing-plumbing/
https://www.homedepot.com/c/ah/how-to-use-a-pex-clamp-without-tool/9ba683603be9fa5395fab9013b0e8327
https://www.tooltally.com/how-to-use-a-pex-clamp-without-tool/