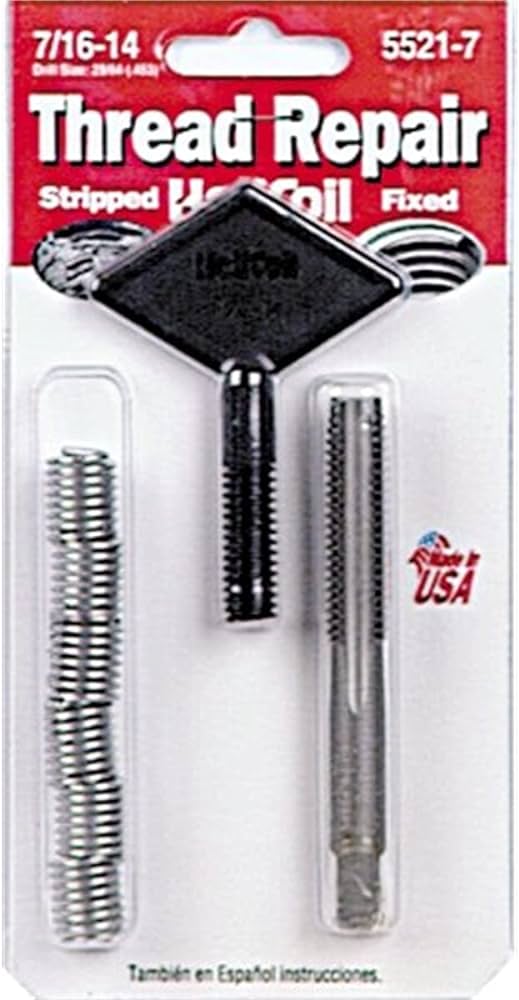
Helicoil Tool: The Ultimate Guide to Thread Repair
Do you know what a helicoil tool is? If not, then you have come to the right place. In this comprehensive guide, we will take a deep dive into the world of helicoil tools and everything you need to know about them.
In today’s fast-paced world, we all want things done quickly and efficiently. Whether it’s fixing a car engine or repairing a broken thread, we want it done right the first time. This is where the helicoil tool comes in handy. It is an essential tool for anyone who wants to repair threads quickly and easily.
What is a Helicoil Tool?
A helicoil tool is a threaded insert that is used to repair damaged or stripped threads. It consists of a coiled wire that is inserted into a hole that has been drilled out to a larger diameter than the original thread size. The helicoil then becomes the new thread for the bolt or screw.
Helicoil tools are commonly used in automotive, aerospace, and manufacturing industries. They are also used in general repairs and maintenance work, making them an essential tool for any mechanic or DIY enthusiast.
The Benefits of Using a Helicoil Tool
There are many benefits of using a helicoil tool over other methods of thread repair. Here are just a few:
1. Saves Time: Using a helicoil tool can save valuable time when repairing damaged threads. Unlike other methods, such as tapping or re-threading, which can be time-consuming and complicated, using a helicoil tool is quick and easy.
2. Cost-Effective: A helicoil tool is cost-effective compared to other methods of thread repair. It eliminates the need for expensive replacement parts and reduces downtime by allowing repairs to be made quickly.
3. Stronger Threads: Helicoil inserts create stronger threads than those that were originally present. This is because the coiled wire provides a larger surface area for the bolt or screw to grip onto, resulting in a more secure and reliable connection.
4. Versatility: Helicoil tools can be used on a variety of materials such as aluminum, steel, and even plastic. This makes them a versatile tool that can be used in many different applications.
How to Use a Helicoil Tool
Using a helicoil tool is relatively easy and straightforward. Here are the basic steps involved:
1. Drill out the damaged thread to a larger diameter than the original size.
2. Tap the newly drilled hole with the appropriate tap size for the helicoil insert.
3. Insert the helicoil tool into the tapped hole using an installation tool.
4. Break off the tang on the end of the helicoil insert using pliers or a similar tool.
5. Screw in your bolt or screw into the new helicoil thread.
It’s important to note that while helicoil tools are easy to use, it’s always best to follow manufacturer instructions closely to ensure proper installation.
Types of Helicoil Tools
There are several types of helicoil tools available on the market today. Here are some of the most common ones:
1. Free Running Inserts – These inserts have a smooth surface finish and provide a strong, wear-resistant thread.
2. Screw Locking Inserts – These inserts have special locking coils that grip tightly onto screws, preventing them from loosening due to vibration or other forces.
3. Tangless Inserts – These inserts don’t have a tang, making them easier to install and reducing waste during installation.
4. Spark Plug Inserts – These inserts are specifically designed for repairing damaged spark plug threads on engines.
Choosing the right type of helicoil tool will depend on your specific application and requirements.
Tips for Using Helicoil Tools
Here are some tips to keep in mind when using a helicoil tool:
1. Measure Twice: Before drilling out the damaged thread, double-check the size of the tap and helicoil insert to ensure a proper fit.
2. Clean the Hole: Make sure to clean out any debris or metal shavings from the drilled hole before inserting the helicoil tool.
3. Use the Right Tap: Using the correct tap size is crucial for creating threads that are strong and secure.
4. Don’t Over-Tighten: Over-tightening can cause damage to both the helicoil insert and the surrounding material. Always follow manufacturer torque specifications.
5. Test it Out: After installing the new helicoil threaded hole, test it out with a bolt or screw to ensure a proper fit and function.
Conclusion
In conclusion, a helicoil tool is an essential tool for anyone who wants to repair damaged threads quickly and efficiently. They provide many benefits over other methods of thread repair, such as being cost-effective, time-saving, and creating stronger threads.
By following manufacturer instructions closely and using these tips, you can ensure proper installation and get back to work in no time. So next time you encounter a damaged thread, consider using a helicoil tool for your thread repair needs.
References:
1. “Helicoil – Threaded Insert System.” Emhart.com.
2. “How to Install Helicoil Inserts.” Wikihow.com.
3. “Thread Repair – Helical Coil vs Tapping.” Blog.emachineshop.com.
4. “A Beginner’s Guide to Installing Helicoils.” Autoevolution.com.