It’s a perfect chance to save yourself some money and walk around the nearest shoe repair shop by repairing your old shoes at home. Also, the best bit of the game plan is you don’t have to purchase new ones. With the correct techniques and devices, you can repair exhausted soles, openings in your shoes and unpalatable stains and scratches. This can be cleared by putting in no time of effort and time and the result is that you can grasp your most cherished counterpart for an impressive period of time to come!
Enduring exhausted soles: Wipe clean the base of the shoe with a wet texture and get together any clean that is filled amidst the sole and the base of your shoe. When you are done with the cleaning, let the shoe dry completely. If some old sole glue is stuck at the base of your shoe, dive the texture in ethanol nail clean remover and rub it until the point that the moment that it tumbles off. Buy a thick sandpaper and rub the sole and the base with it. Use a coarse sandpaper having coarseness of around 50-70. It will make a tolerable surface for the glue to stick to. When you are done with all the beforehand specified advances, now is the correct time now to apply the shoe repair glue to the sole and the base. Use a paintbrush of around 2cm round nib to consistently spread the glue on the best surface of the sole and the revealed base of the shoe. Shoe repair glue can be found at an area merchant or at the shoe stores. Read the rules indicated on the sign of the glue for fitting use as some glue anticipate that you will sit tight for 4-5minutes after apply the glue at first look and let it get dry a bit before remaining the sole and the base. After you have stuck the soles, its chance to press the sole into the base and you can use pound for it to fit really into its place. Hammer your shoe delirious turvy and on the domain where you are interfacing the sole. Use pound at the base and move the hammer to some degree each time keeping in mind the end goal to cover the entire domain of the sole you are adding. You can similarly use a clasp to hold the sole set up for couple of hours. Fasten down the territory of the sole that you are affixing. Oust the clasp from your shoe following a couple of hours. Check whether the sole is completely adhered to the base by endeavoring to gently pull it along the edges with your thumb. In case the sole remains set up, by then my friend your shoe is set up for use.

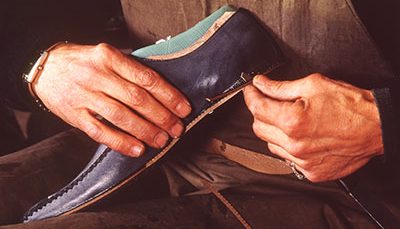
Fixing Openings with Shoe Goo
To fix an opening in your shoe you have to begin off by cleaning the region around the gap in your shoe with a wet fabric. Wipe off the zone in and around the gap and search for earth particles. Once the region is perfect, given the region a chance to dry for quite a while before you continue further. Shoe Goo is most appropriate for the openings in the soles. A delicate update, on the off chance that you feel that you can repair an opening in the highest point of your shoe at that point remember that the gap will in any case be perceptible even after you have filled it in. As specified in the past segment, utilize 120-coarseness sandpaper to scratch up the territory around the gap. Make a point to rub the coarse side of the sandpaper forward and backward finished the opening until the point that you see a harsh surface beginning to frame. This will enable the Shoe Goo to adhere to the sole. When you are finished with the above advances, its opportunity to expel the insole and apply a bit of tape (pipe tape) over the gap. Put the conduit tape from within the shoe. It will keep the shoe goo to leak inside your shoe when you apply it. Turn your shoe around and fill in the gap with shoe goo. Shoe goo is a reasonable thick glue that turns out to be difficult for drying. Make a point to crush the container of shoe goo gradually and move it over the gap as it turns out. One can locate a normal valued container of Shoe Goo on the web or at nearby store. Keep in mind on the off chance that you missed any spots. utilize ice blocks to spread the shoe goo equally finished the surface as shoe goo doesn’t stick to ice. Ensure the layer of shoe goo is level and even finished the opening. After use of the shoe goo let it dry for no less than 12 hours. Try not to surge the procedure or it won’t follow appropriately. Keep the shoe in a sheltered place with the goal that it won’t be bothered. Once the shoe goo dries make a point to sand it down with the 120-coarseness sandpaper until the point when it matches with rest of the sole. Evacuate any knocks and they will make your strolling troublesome.
Expelling stains and scrapes
One method for evacuating scrapes is to eradicate it with the assistance of a pencil eraser. Ensure that the eraser is perfect and sufficiently enormous to utilize. Rub it forward and backward till the scrape at last vanishes. Another approach to expel scratches from your cowhide shoes is to top them off with felt tip markers. In the event that your shoes are dark colored utilize a darker felt tip marker and in like manner. Felt tip markers are accessible in a larger number of hues than the shades of your calfskin shoes. In this way, don’t stress over finding the correct match. Simply make a point to utilize it legitimately else you will have markers on your shoes at places with no scratches. Another approach to expel scrapes from cowhide shoes is to influence utilization of oil to jam. Dunk a cotton bud in oil jam and delicately rub into the scrape of the shoes until the point that it blurs off. Another home solution for dispose of salt stains on your calfskin shoes is to utilize white vinegar. Plunge the edge of a material into a bowl loaded with white vinegar. Rub the splashed fabric onto the stains till they are no more.